Showing posts with label Black. Show all posts

Friday, December 5, 2014

KkCenterhk - Eyeballs! Eyeballs EVERYWHERE!

*Products sent to me for review
Hey there, everybun!
KKCenterhk was kind enough to send me these 6mm Eyeballs to review..No not REAL eyeballs, they're..well.. You can see below!


Click below to see what I did with them!

Wednesday, November 5, 2014

Zoya Simple Sideways French

Hey everybun!
Happy Humpday.
Lazy me doesn't have much to post, since I have 2 new collections ready to roll out, I've been lacking on the nail art/polish as well as my Friday Find posts. 
BUT, I have something for you today, so that's all that matters, right?!

Monday, October 27, 2014

Skull Cutout Nail Art

Happy Monday, everybun!
I've been super fascinated with cutouts and cutout nail art recently and decided to have my own go at it with my own twist.

Tuesday, September 23, 2014

KKCenterHK - Leopard Water Decal Review

Hey everybun
Happy, Tuesday!
You must excuse my late post, because hot damn is this semester hard. The tests! The quizzes! O' Athena, spare me some smarts!
Anyways, enough with the dramatics, let's get it on...To the review..

These darn water decals have been sitting, taunting me for months. Why? You ask? Well ,the first time I attempted to put them on, I managed to get them off the white backing, but for some reason there was an added plastic backing between the decal and the white backing. 
I hadn't figured this out until recently, and every time I'd attempt to use these, they just wouldn't work.
Finally, I FORCED two of them off, after ruining 4, I decided to just stick to a simple mani.

Taken with Flash

Monday, September 15, 2014

Bumble Bee's for Silly Bee's Chickadees!

Hullo there everybun!
I'm excited to post these nails that I've done for Silly Bee's Chickadee's nail art contest. The only rule was they had to be gold. The contest is going on at her Facebook page. And if you'd like...
You can vote for me HERE
(Be sure to check out the other ladies too! You can vote for more than one design!)


Monday, June 2, 2014

KKCenterHk Review - Baby Blue 2mm Circle Nail Art Decorations

*This product was sent to me for review in exchange for my honest opinion
Hey there lovely peoples of the internet! 
I know, I went missing again. But life is life, right? I have been recovering and recuperating from the terrible news last week that my favorite aunt had passed away. She lived 3 hours north from me and we were given super short notice. It was basically like I had to pack up immediately and leave, so I'm sorry to all for the lack of notice! I've just now had the energy to open up the ol' lappy and see what was chilling in my unposted folder since I haven't really been able to do my nails much this past week.
So here we are!
I had gotten these to review sometime during my hiatus and finally a couple of weeks ago was able to give them a proper go on the nails.


These pretty little blue diamonds, which you can find HERE, are absolutely gorgeous in person. My lighting turned out a little wonky but they have this really pretty rainbow-ish shimmer to them.


The only complaint I have with these is how tiny they are. It's not really so much that they're tiny, it's that SINCE they're tiny, they're super hard to pick up. I found that tweezers did absolutely nothing, maybe one of those wax sticks would have worked a little better. My polish had dried on my ring finger many times before I could get these on the nail fast enough.


I was able to put top coat over these without them looking all weird as well! I didn't on my ring finger, because after the hassle of putting these all on I said F#$% it and angrily grabbed my camera to get the pictures over with.

Seriously though, they're super pretty little diamonds that would be great for any nail art occasion, just expect a little extra time fiddling with these little guys.

Overall?
8/10
Would recommend.

Click HERE to be taken to their site!

Use code : LeeshasLacquer
for 10% off your total purchase!

Friday, May 16, 2014

Look what the CAT dragged in!

HELLO EVERYBUN WOOO
WOO WOO WOOOOO!
I'm back!
Can you tell I'm excited? BECAUSE I AM! It sucked to look longingly at the blog, knowing that it was on hold but I was so super busy! Now that college is over for the semester and I don't have to worry about anything til next semester, which is fall, I have my shop and my blog to keep me company.
So on to the mani!
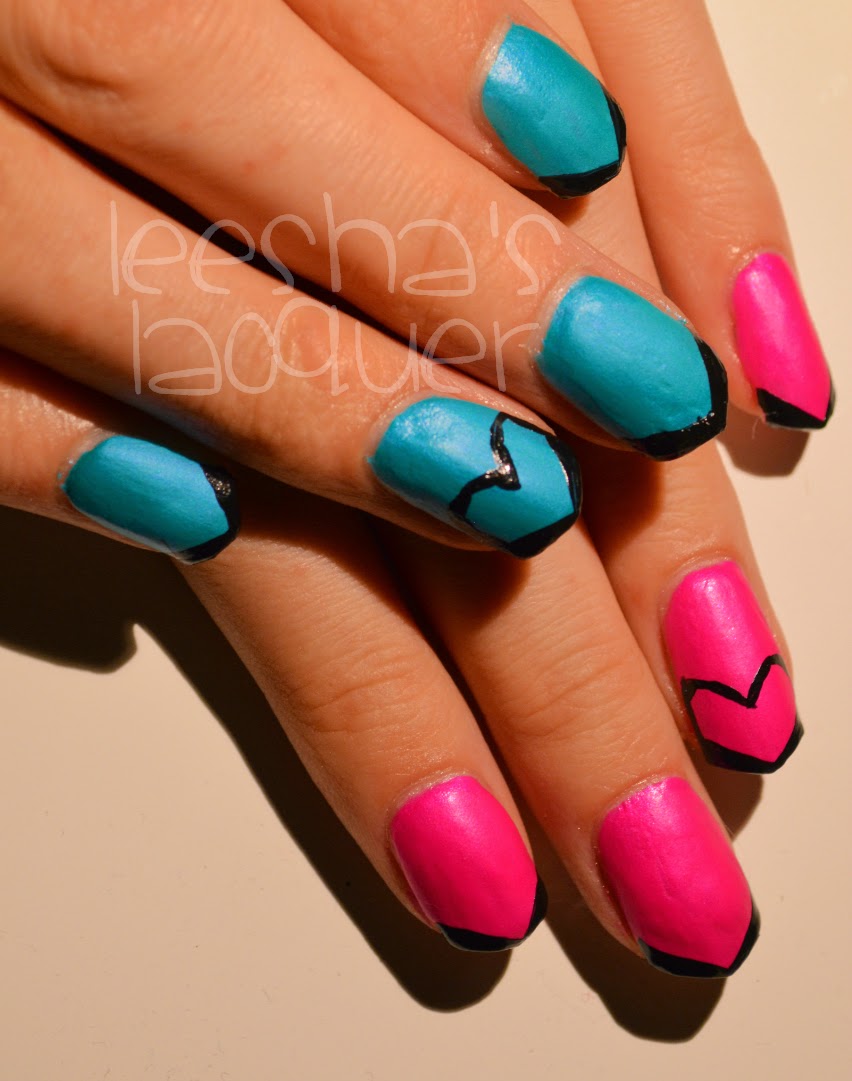
I have been LOVING my new nail shape and figured I'd incorporate it into my first design back and this is what I came up with.


I used Salon Perfect in Fired Up Fuchsia and Bermuda Baby which were my first experiences with Salon Perfect. I LOVED the formula. Can you believe this is only 2 coats and on some nails it was opaque in just one coat?! Not to mention dat satin finish, tho! I loved the finishes so much I didn't even add top coat. The black was done with an I heart nail art pen by Sally Hansen in Black.Which, by the way, almost caused me to flip a table and punch a large mammal, because halfway through the ol' nail art process it began to goop up like nobodies business. I gave it a little shake, cursed, and added some thinning drops. Whether it was the cursing or the thinning drops (the world may never know) I was able to persevere, and finish the design on my right hand, albeit a bit sloppier a la my middle finger.

Over all, everything turned out super fantastical and awesome and I wore this design for a week..Not because I really REALLY liked it but to be honest, I was just really, really lazy and the design turned out decent enough to show off to the world.

So ladies and the occasional fabulous male, how have your nail art adventures been? Anything cool or different happen lately?
See you all Monday, loves!


Monday, March 31, 2014

Panda Nail Art

Hello everybun!
Though I haven't had any much of nail art posted last week, I was working super hard on nail related things! I made over 100 mini bottles of polish, updated and quality checked all my inventory and made tons of 3 and 5 mini polish grab bags. It's all for my upcoming Craft Show. I'll be sure to post plenty of pictures and post the nails that I'll be wearing that day.
Accept these Panda nails as a trade off for all of the shop work I've been doing!


I used a dotting tool for everything besides the ring finger panda. I used my Bissu white which is unnamed and the black pictures, which is a black from Hot Topic. Then I topped it all off with a coat of Seche Vite. 

I hope to see you all Wednesday, but if I don't, know that I'm not intentionally ignoring you all! The craft show is the 5th and I'm getting all of my last minute polish things done.

Thanks for stopping by!


Monday, March 24, 2014

KKCenterhk Review - Black Mirror Nail Foil

*This product was sent to me for review in exchange for my honest opinion
Hey lovelies, Monday has almost come and gone, but I managed to fit a post in before the day has ended!
I have for you today some very interesting nail foils that I absolutely LOVE from KKCenterhk. So let's get to it!


The most interesting thing happened with these. I used Jessica - Black Matte as my base, then used the Beauty glue that came with the nail foils, slapped the foils on, and proceeded to use top coat...


...and this happened! The nails with topcoat turned from reddish/orange to blue! I marked the nails, as you can see, above.

I always recommend using top coat, (Seche Vite is my choice) with nail foils because they otherwise shed off really easily. I'm not sure if it was the Seche Vite or what, but I was definitely surprised when it happened!

The shiny effect that these foils have isn't exactly mirror, and they look a bit textured (though that could just be my error in applying them!), but I still love the effect they give!

You can find these foils here or you can check out the other nail foils they have here.

Click HERE to be taken to their site!

Use code : LeeshasLacquer
for 10% off your total purchase!


Wednesday, February 19, 2014

Simple Half Moon Nail art with a twist!

Hey all! 
I was stumped with what to do today, but had a last minute spur of creativity!
This is a half moon mani with a twist!


I started out with my base color, Square Hue - Shibuya then used my Sally Hansen I <3 Nail Art Black striper to make the spikeys.
This was incredibly simple and adds quite a bit of pizzazz to the typical half moon nail art.
I love it so much I'm going to keep it until Friday, when I have to do another post!
Happy Humpday!


Monday, February 17, 2014

Jelly Sandwich!

Hey all! 
It's Monday and that means another Mani Monday Challenge hosted by The Nail Files by Lynda.
Today's theme is Jelly Sandwich which means I had to try this out for the first time ever! I wasn't sure if it would turn out but I believe I did decent! Here it is:


I guess you couldn't really tell if it was a jelly sandwich by first glance, but I promise you it is!
I started out with black as a base, then added my glitter, which I made and you can see in the picture. Then I added a coat of holo-y-color shifty goodness that I also made, then more glitter, then holo-y-color shifty goodness and topped it off with another coat of glitter.
Also, you probably recognize this holo/color shift polish from last week. I don't have that many jelly polishes, so had to make do with the closest thing I had to jelly!

The irridescent hexes are awfully picture shy so they didn't really make an appearance in the photos above.
For my next jelly sandwich, I think more contrasting colors would make the sandwich more obvious, but for a first try, I'd say it looks fine! See you all Wednesday!


Wednesday, January 22, 2014

One Stroke Nail Art

Hello All!
Now, This was my first time dabbling into the one stroke world. I am normally awful with painting. The paints, as much as I will them to move in the way I want, refuse to cooperate with my brush strokes. So you can see how I was nervous to try this beautiful and seemingly easy technique.
After a few (ahem, an hours worth of..) flubs with my test nail, I grudgingly  decided that it was time to begin on my real nails. The results turned out..


..better than expected! Though I DID go to a Panic! At the Disco concert yesterday (which was awesome by the way! Brand Urie is just..<333), so I had to do both hands..I was much to embarrassed to take a picture of the mess that was my right hand.

The base color is Zoya - Storm and, of course, the rest is acrylic paint.


Another fun fact, I ALWAYS have flowers in the house. They're usually just chillin' on my kitchen table because there's nowhere else to really put them but I LOVE flowers and cannot go without them to liven up the room. I get sad when they die and I have to throw them away, but then I'm just off to Sams Club to get another bunch! 
I hope you all enjoyed my first attempt at one stroke and the pretty little flower shots!
Happy Humpday and I'll see ya'll again on Friday (My 20th Birthday :D)


Monday, January 6, 2014

KKCenterhk Review - Nail Foil

*This product was sent to me to review in exchange for my honest opinion
I have a few days that Bloggers weren't able to guest post for me, due to the fast pace of the seasons, so it looks like you're stuck with me for a few more scheduled posts until I'll be back for real real and not for play play! Enjoy!

Today I have some awesome nail foils that I've grown to love from KKCenterhk. You can find these foils here
I decided to take a different approach with the nail foils this time and paint on a random pattern with the tacky glue that they sent me. If you're curious on how to apply these, check my other post here.

Gold foil over a Black Base color


I added a coat of Seche Vite onto these and noticed that the star pattern that you see in the bottle sort of shrivels up to give a cool rustic look to the gold pattern. Remember to always use top coat with nail foil, otherwise it starts to peel off and that's never fun!
I'm so happy with the gorgeous gold painted look that these foils achieved and they literally took less than 10 minutes (most of the time was spent waiting for the glue to dry!)
You can get The Foil for $6.92
The Foil + A Smaller Glue for $8.86
The Foil + Glue for $10.80
+Shipping

Click the banner to be taken to their site!

Use code : LeeshasLacquer
for 10% off your total purchase!


Monday, December 30, 2013

Rambles of a Polish Addict Guest Post #2


Hi y'all! I'm Katherine from over at Rambles of a Polish Addict and Leesha asked me recently if I could do a guest post for her while she was away on vacation, and I came up with this fun dream catch nail art for you. Leesha reached out to me recently when my bunny passed away (sad face) and sent me a custom polish in Foofy's honor, which I've included in this mani as well.


For this look I used Sinful Colors Hazard as the base color. And two coats of the polish Leesha sent me on the ring finger for an accent. Just two coats and the glitter was nearly fully overing the base color, it's a total glitter bomb! Packed sooo full with all that glitter and it all looks so pretty on the nail, I love it.


For the rest of the details I did them all with acrylic paints in various colors and a tiny little detail nail art brush. It took me a while to think of something when Leesha asked if I'd like to do a guest post, of course I said yes right away, but then thinking of what to do.. that was harder. But then I thought of something I've been wanting to do for a while and never could find a reason to. And I also wanted to be sure it would be something different than what's been on my own blog lately, and since I've never done dream catchers and have been wanting to, it was perfect!


So I hope you all enjoy themeven if they were more bright and summery than necessary for these winter months.

If you'd like to see more of Katherines beautiful nail arts be sure to check out her blog
Rambles of a Polish Addict

Tuesday, November 19, 2013

Broken heart :(

Well, I don't have a broken heart, but my nails sure do. This mani is dedicated righty, pointer finger. Rest in pieces, wherever you are righty! This broken heart's for you!

I used a Migi nail art pen for the hearts
and
Zoya - Claudine as the base
I guess it's more of a broken, mosaic heart, but what evs. I also didn't want to COMPLETELY bring the mood down with my broken nail, so I added hearts on the other nails!

I suppose all is well, since I use acrylic, all I had to do was add an extension and re-sculpt, something most of you ladies unfortunately do not have the pleasure of doing when you get a break!

OO OO OO! Also, after I discovered my broken nail, I got this AWESOME review from Gnarly Gnails (all happiness was instantly restored!)
Check out her swatch of Song of the Seas ..


Be sure to check out the rest of her review here as well as an awesome coupon code just for her readers!
(I'm literally squeeing to see my polish on her nails! SQUEE!)

See you all soon. (I have a black friday deal up my sleeve that I think you all will love!)


Tuesday, November 12, 2013

Henna Inspired Nail Art

Ever since I did my henna a few months ago, I've REALLY wanted to do a henna nail art design!
Now, this one wasn't as I had planned and I wanted it to be much more intricate, but here it is

Wet n Wild - Silvivor
Julep - Matte Top Coat
Migi nail art pen in Black

I still think it turned out pretty well though!
I've since took this off, and I'm on a two day streak of not wearing polish and it's getting pretty depressing. BUT, I have been pouring my time in making some blogger sets, making sure that everything is mixed and the minis match up to the full sizes, which means I have some new polishes coming out that I hope ya'll will lurve.

See you all soon!


Friday, October 18, 2013

Halloween Nail Art


Hello everybun!
Time for my first Halloween Nail Art of the season!

Wet n Wild : Ebony Hates Chris, Sunny Side Up and Club Havana

I decided to do a silhouette type of dealy of a haunted house, some bats and a kitty cat. My bats look more like spiders though :(

Have a happy happy Friday!


Tuesday, October 15, 2013

New! TEXTURED Nail Polish!


Say hello to Grainy Day! My newest edition to a permanent collection in my Etsy shop. Now, I know I said I was switching to store envy, but the traffic from Etsy has really gone down since I've taken away most of my polishes. Which is why I've decided to list my OOAKs in the storenvy and my every day polish will be in my etsy shop!


This baby's only $7 in my etsy shop and you can find her here

Super texture close up!!! Whoahhh , so texture, much wow!
                                        

Thursday, September 26, 2013

Fall Leaves

Hey Everybun!
Even though I'm in shorts and a tank top today (and the high tomorrow is in the upper eighties) I just KNOW that fall is coming soon! So Fall leaves it is!


Base color : Maybelline - Twilight Rays
Migi Nail Art Pens (Red,Orange and yellow)